Overview
Worked examples for the network problems I keep running into, like a name that resolves differently depending on who you ask, or a certificate that verifies in the browser but not in curl.
Most of the tools run on Linux and inside Cygwin, a Linux-like environment for Windows, so you can use the same commands on a locked-down Windows laptop. Each tool page lists where to get it on each platform.
The source is on GitHub.
Installation
These steps install Cygwin on Windows as a regular user, without administrator rights.
-
Go to the Cygwin install page and download the 64-bit installer,
setup-x86_64.exe. -
Open up a Windows PowerShell terminal.
-
Change to the folder you downloaded it to (usually Downloads).
-
Run
.\setup-x86_64.exe --no-admin. The setup window should pop up.--no-admininstalls in user mode, so Windows won’t ask for administrator rights. -
Click through the setup screens:
Setup Screen
- Click “Next”.
Choose a Download Source
- Select “Install from Internet”, then click “Next”.
Select Root Install Directory
- The default is
C:\cygwin, installed for all users on the machine. - Click “Next”.
Select Local Package Directory
- Click “Next”.
Select Your Internet Connection
- Click “Next”. The default uses your system proxy settings.
Choose a Download Site
This is the mirror Cygwin downloads packages from. Pick one close to you that you trust to serve binaries.
I usually pick Virginia Tech (VT) or Rochester Institute of Technology (RIT).
- Once selected, click “Next”.
Select Packages
- Click “Next”.
Review and Confirm Changes
- Click “Next”.
Progress
- Wait for the install to finish.
Create Icons
- Add a desktop icon if you want one.
- Click “Finish”.
-
Open the Cygwin terminal from the Start menu or the desktop icon.
Tools
Cygwin packages a large set of open source Unix tools for Windows. These are the ones I reach for when a network problem needs diagnosing, plus a few that only run on Linux.
The table shows where each tool comes from on each platform: a Cygwin package on Windows, and a dnf or apt package on Fedora and Ubuntu. N/A in the Cygwin column means the tool is not packaged for Cygwin. Several of those have native Windows builds instead; each tool’s own page has the details.
Open Source Tools
| Command Line Tool | Cygwin Package | Fedora (dnf) | Ubuntu (apt) | Usage |
|---|---|---|---|---|
| curl | curl | curl | curl | command line tool for sending/receiving web requests |
| dig | bind-utils | bind-utils | bind9-dnsutils | DNS lookup tool, like nslookup but more useful |
| delv | bind-utils | bind-utils | bind9-dnsutils | DNS lookup with full DNSSEC validation and tracing |
| drill | N/A | ldns-utils | ldnsutils | dig-like DNS tool with DNSSEC signature chasing |
| git | git | git | git | version control; useful for debugging SSH/TLS transport issues |
| ipcalc | ipcalc | ipcalc | ipcalc | IP addressing calculator for subnet in CIDR notation |
| iperf3 | N/A | iperf3 | iperf3 | measure throughput between two machines |
| mtr | N/A | mtr | mtr-tiny | traceroute that keeps running and tracks per-hop loss |
| netcat | nc, nc6 | nmap-ncat | netcat-openbsd | swiss army knife for testing network connectivity |
| netstat | Windows netstat.exe | net-tools (or ss) | net-tools (or ss) | show listening ports and open connections |
| ntttcp | N/A | build from source | build from source | Microsoft’s network throughput benchmark |
| openssl | openssl | openssl | openssl | toolkit for testing SSL/TLS connections and certificates |
| openssh | openssh | openssh-clients | openssh-client | ssh, sftp, and scp |
| rsync | rsync | rsync | rsync | resumable, bandwidth-limited file synchronization over SSH |
| strace | N/A | strace | strace | trace the system calls a process makes (Linux) |
| tcpdump | N/A | tcpdump | tcpdump | capture packets for reading in Wireshark |
| testssl | runs in Cygwin bash | testssl | testssl.sh | scan a webserver’s TLS protocols, ciphers, and certificates |
| trippy | N/A | copr or cargo | PPA or cargo | mtr with a nicer live terminal UI |
| unfrl/dug | N/A | GitHub .rpm | GitHub .deb | query DNS servers worldwide to check propagation |
| watch | procps | procps-ng | procps | re-run a command on an interval and watch its output |
| whois | whois | whois | whois | look up who owns a domain, IP, or AS number |
Curl
curl is the de-facto command line tool for sending and receiving data over URLs. For network debugging it is the fastest way to answer a few recurring questions: is the website up, where does the time go in a request (DNS, TCP, TLS, first byte), which certificate is the server presenting, and does the problem follow a particular IP or proxy.
Availability
| Platform | How to get it |
|---|---|
| Windows (Cygwin) | install the curl package |
| Windows (native) | curl.exe ships with Windows 10 (1803+) and Windows 11 |
| Fedora | sudo dnf install curl (usually preinstalled) |
| Ubuntu / Debian | sudo apt install curl |
One thing to know before comparing results across platforms: the native Windows curl.exe uses the Schannel TLS backend and the Windows certificate store, while Cygwin and Linux builds typically use OpenSSL with a ca-certificates bundle. If a site verifies on one and fails on the other, suspect the trust store, not the network.
Examples
- Check whether a site returns HTTP 200
curl -sI https://www.google.com | head -n 1
- Print only the HTTP status code
curl -s -o /dev/null -w '%{http_code}\n' https://www.google.com
- Break down where the time goes in a request (DNS vs connect vs TLS vs first byte)
curl -s -o /dev/null -w 'dns: %{time_namelookup}s\nconnect: %{time_connect}s\ntls: %{time_appconnect}s\nfirst byte: %{time_starttransfer}s\ntotal: %{time_total}s\n' https://www.google.com
- Run curl via a SOCKS proxy. The
socks5h://scheme (note theh) makes the proxy resolve the domain name instead of resolving it locally. Use it when the destination is only resolvable from the far side of the proxy.
curl -vvvx socks5h://localhost:4020 https://www.google.com
- Trust a different CA bundle, such as your company’s internal root
curl -sv --cacert internal-root-ca.pem https://auth.example.com
- Present a client certificate for mTLS (see Network Basics for how the mTLS handshake works)
curl -sv https://auth.example.com --cert example.pem --key key.pem
Headers Only
curl -sI https://www.yahoo.com 2>&1
Pinning an IP
This keeps SNI and the Host header correct while pinning the connection to one address. Useful for testing a single backend behind a load balancer, or a server whose DNS record does not exist yet:
curl -vv https://dns.google.com --resolve dns.google.com:443:8.8.8.8
Continuous Monitoring
- Continuously check https://fonts.bunny.net every 10 seconds, with a total timeout of 3 seconds per attempt. Use Ctrl+C to kill.
while true; do curl -s -o /dev/null -w '%{http_code}\n' --max-time 3 https://fonts.bunny.net; sleep 10; done
- Same idea, but forcing IPv4 and a connection timeout of 10 seconds, printing the HTTP status line:
while true; do
  curl -s -4 https://fonts.bunny.net \
    --connect-timeout 10 \
    --no-progress-meter -D - -o /dev/null | head -n 1;
  sleep 10;
done
- With a timestamp on each line (
tscomes from themoreutilspackage):
while true; do
  curl -s -4 https://fonts.bunny.net \
    --connect-timeout 10 \
    --no-progress-meter -D - -o /dev/null | head -n 1 | ts;
  sleep 10;
done
Testing Broken TLS
- Use badssl.com to test client behavior against known-bad TLS configurations (expired, self-signed, wrong host, weak ciphers):
curl -sv https://expired.badssl.com/
curl -sv https://self-signed.badssl.com/
curl -sv https://wrong.host.badssl.com/
TLS Triage explains what each resulting curl exit code means and how to follow it up.
Delv
delv (domain entity lookup and validation) is dig’s DNSSEC-aware sibling from BIND 9. Where dig shows you the raw DNS answer, delv performs full DNSSEC validation itself and tells you why a chain of trust fails. That is exactly what you need when a domain works on one resolver but returns SERVFAIL on a validating one.
Availability
| Platform | How to get it |
|---|---|
| Windows (Cygwin) | included in the bind-utils package |
| Fedora | sudo dnf install bind-utils |
| Ubuntu / Debian | sudo apt install bind9-dnsutils |
Examples
- Validate a record and show the validation result (
; fully validatedor; unsignedin the output):
delv www.cdc.gov A
- Show the full validation logic step by step with
+vtrace, and format multi-line records readably with+multi. Querying the same TLSA (DANE) record through several public resolvers tells you whether a DNSSEC problem lives in the zone itself or in one resolver’s cache:
delv @1.1.1.1 cdc.gov TLSA +multi +vtrace
delv @8.8.8.8 cdc.gov TLSA +multi +vtrace
delv @62.149.128.4 cdc.gov TLSA +multi +vtrace
delv @208.67.220.220 cdc.gov TLSA +multi +vtrace
delv @208.67.222.222 cdc.gov TLSA +multi +vtrace
delv @185.228.169.9 cdc.gov TLSA +multi +vtrace
- See what a broken domain looks like. Instead of a bare SERVFAIL, delv prints the specific failure (expired signature, missing DS record, bogus chain):
delv dnssec-failed.org A +rtrace
Other Tools
Web-based tools for cross-checking a DNSSEC problem you found with delv:
- DNSViz, which draws the whole chain of trust
- Verisign DNSSEC Debugger
- Ianix DNSSEC Outages
Dig
dig (domain information groper) is the standard DNS lookup tool from BIND. It’s the first thing to run when a name does not resolve, resolves to the wrong address, or resolves differently depending on which resolver we ask.
Availability
| Platform | How to get it |
|---|---|
| Windows (Cygwin) | install the bind-utils package |
| Windows (native) | no official build; nslookup or PowerShell Resolve-DnsName are rough equivalents |
| Fedora | sudo dnf install bind-utils |
| Ubuntu / Debian | sudo apt install bind9-dnsutils (older releases: dnsutils) |
Examples
- Just the answer, no noise:
dig +short www.google.com
- Query a specific record type:
dig +short www.google.com AAAA
dig +short google.com MX
dig +short google.com TXT
- Ask a specific resolver. Comparing your local resolver against a public one is the quickest way to spot split-horizon DNS or a stale cache:
dig @8.8.8.8 www.google.com
dig @1.1.1.1 www.google.com
- Reverse lookup of an IP:
dig -x 8.8.8.8 +short
- Trace the delegation from the root servers down. This shows which nameserver actually hands out the answer:
dig +trace www.google.com
- Check the SOA serial on each authoritative nameserver to spot a zone change that has not propagated:
dig +nssearch google.com
- Watch a record continuously (for example, while waiting for a DNS change to propagate). Use Ctrl+C to kill.
while true; do dig +short www.va.gov; sleep 5; done
EDNS Client Subnet
With EDNS Client Subnet (ECS), a recursive resolver forwards part of your address (usually the /24) to the authoritative server. CDNs use that to pick an edge near you instead of near the resolver, which is why the same name can resolve to different addresses depending on who asks.
- Pretend to be in a different network and compare the answers. Google Public DNS refuses anything longer than a /24, so give it a network like
120.5.5.0/24rather than a single IP:
dig +short @8.8.8.8 google.com +subnet=120.5.5.0/24
dig +short @8.8.8.8 google.com +subnet=121.5.5.0/24
Without +short, the OPT pseudosection shows a CLIENT-SUBNET line. The last number on it is the scope the authoritative server used for its answer.
- Find out what subnet a resolver forwards for you. A TXT query for
o-o.myaddr.l.google.comreturns the resolver’s egress IP, plus anedns0-client-subnetline when ECS was sent:
dig +nocmd @dns.google. -t txt o-o.myaddr.l.google.com +nocomments +noall +answer +stats
dig +nocmd @resolver1.opendns.com -t txt o-o.myaddr.l.google.com +nocomments +noall +answer +stats
dig +nocmd @one.one.one.one -t txt o-o.myaddr.l.google.com +nocomments +noall +answer +stats
Google and OpenDNS return the edns0-client-subnet line. Cloudflare’s 1.1.1.1 leaves ECS out for privacy, so you only get its own address back. Sites that geolocate with ECS can hand 1.1.1.1 users a far-away or wrong answer, and archive.is refused to resolve properly through 1.1.1.1 over exactly this.
Jim Nitterauer’s NolaCon 2017 talk on ECS covers both the CDN and security sides of it.
Drill
drill is a DNS lookup tool from NLnet Labs’ ldns library, built as a dig replacement with DNSSEC support baked in. It behaves like dig and can also chase a DNSSEC signature chain from a record up to the root. When DNSSEC is actually broken, though, delv is the better tool: it does the validation itself and tells you which link failed.
Availability
| Platform | How to get it |
|---|---|
| Windows (Cygwin) | not packaged for Cygwin; use dig / delv instead |
| Fedora | sudo dnf install ldns-utils |
| Ubuntu / Debian | sudo apt install ldnsutils |
Examples
- Basic lookup, dig-style:
drill www.google.com
drill @8.8.8.8 google.com TXT
- Reverse lookup:
drill -x 8.8.8.8
- Trace a name from the root servers down (like
dig +trace):
drill -T www.google.com
- Chase the DNSSEC signature chain from the record up to the root, printing every DNSKEY/DS link along the way (
-Drequests DNSSEC records,-Schases the chain):
drill -DS www.cdc.gov
Dug
dug is a global DNS propagation checker: it queries hundreds of public DNS servers around the world at once and reports what each one answers. Use it after a DNS change to see how far the new record has spread, or to detect regional DNS poisoning and filtering, where a domain resolves differently by country.
Availability
dug is a .NET application distributed from GitHub releases. There is no Cygwin, dnf, or apt package in the standard repositories.
| Platform | How to get it |
|---|---|
| Windows | download the Windows binary from GitHub releases (runs natively; usable from a Cygwin terminal) |
| Fedora | download the .rpm from GitHub releases |
| Ubuntu / Debian | download the .deb from GitHub releases |
Examples
- Quick propagation check with the pretty default output:
dug vaccines.gov
- Query 500 servers worldwide with retries, exporting everything to CSV for analysis in a spreadsheet (which countries see the old record, response times, DNSSEC status, errors):
dug vaccines.gov --retries 10 --server-count 500 --output-format CSV --output-template ipaddress,countrycode,city,dnssec,reliability,continentcode,countryname,countryflag,citycountryname,citycountrycontinentname,responsetime,recordtype,haserror,errormessage,errorcode,value > vaccines.gov-output.csv
Git
git is not a network tool, but fetches and pushes fail for network reasons all the time: SSH key problems, TLS interception by corporate proxies, blocked ports. Git has built-in knobs that expose what its transport (SSH or HTTPS) is actually doing.
If you use Git accounts in several organizations from one machine, see Git and SSH.
Availability
| Platform | How to get it |
|---|---|
| Windows (Cygwin) | install the git package |
| Windows (native) | Git for Windows |
| Fedora | sudo dnf install git |
| Ubuntu / Debian | sudo apt install git |
Debugging SSH
Make git’s underlying ssh invocation verbose. The output shows which key is offered, which host key is received, and where authentication fails:
GIT_SSH_COMMAND="ssh -vvv" git clone <REPO_SSH_URL>
Test SSH authentication to the host directly, without git:
ssh -T git@github.com
Debugging HTTPS
Show the full HTTP conversation including TLS handshake and proxy usage:
GIT_CURL_VERBOSE=1 GIT_TRACE=1 git clone <REPO_HTTPS_URL>
Point git at a corporate CA bundle when a TLS-intercepting proxy breaks certificate verification (prefer this over disabling verification):
git config --global http.sslCAInfo /path/to/corporate-ca-bundle.pem
Further Reading
Ipcalc
ipcalc is a subnet calculator: give it an address in CIDR notation and it prints the network address, netmask, broadcast address, and usable host range. It saves you from doing binary math in your head while reading firewall rules or cloud VPC definitions.
Beware that several unrelated programs share the name. Fedora ships its own ipcalc, while Debian and Ubuntu ship a Perl version with different output and flags. The examples below work on both, but check ipcalc --help on your system.
Availability
| Platform | How to get it |
|---|---|
| Windows (Cygwin) | install the ipcalc package |
| Fedora | sudo dnf install ipcalc |
| Ubuntu / Debian | sudo apt install ipcalc (or sipcalc for an alternative) |
Examples
- What network does this host live in, and what is the usable range?
ipcalc 10.130.75.80/26
On Debian/Ubuntu’s ipcalc this prints the network (10.130.75.64/26), the broadcast address (10.130.75.127), and the 62 usable hosts in between. Run it on two addresses and compare the network lines to settle whether they are in the same subnet.
- Same question for a /22 you see in a cloud VPC:
ipcalc 172.31.48.0/22
Iperf3
iperf3 measures the maximum achievable bandwidth between two machines. Unlike most tools in this guide, it has to run on both ends: one side acts as a server, the other connects to it as a client. Run it when you need to know whether the link itself is slow or the application on top of it is.
Availability
| Platform | How to get it |
|---|---|
| Windows (Cygwin) | not packaged for Cygwin |
| Windows (native) | unofficial builds from iperf.fr or winget / chocolatey |
| Fedora | sudo dnf install iperf3 |
| Ubuntu / Debian | sudo apt install iperf3 |
Examples
- On the server side (listens on TCP/UDP port 5201 by default, so open that port in the firewall):
iperf3 -s
- On the client side, run a 10 second TCP throughput test:
iperf3 -c <server IP>
- Measure the reverse direction (server sends, client receives) without swapping roles. Asymmetric links are common, so test both directions:
iperf3 -c <server IP> -R
- Use 4 parallel streams for 30 seconds. Parallel streams do a better job of saturating high-bandwidth, high-latency links:
iperf3 -c <server IP> -P 4 -t 30
- UDP test at a fixed 100 Mbit/s rate. The report includes jitter and packet loss, which TCP tests hide:
iperf3 -c <server IP> -u -b 100M
- Machine-readable output for graphing later:
iperf3 -c <server IP> --json > result.json
Public Servers
When you do not control the far end, iperf3serverlist.net keeps a list of volunteer-run public servers.
Netcat
netcat (nc) is the swiss army knife for raw TCP/UDP connectivity: it opens a connection (or listens for one) and pipes bytes. Because there is no protocol on top to confuse things, it isolates the most basic question in network debugging: can I reach that host on that port at all? In handshake terms (see Network Basics), a successful nc -vz means the TCP three-way handshake completed.
Availability
| Platform | How to get it |
|---|---|
| Windows (Cygwin) | install the nc package (also nc6) |
| Fedora | sudo dnf install nmap-ncat (provides nc) |
| Ubuntu / Debian | sudo apt install netcat-openbsd |
Versions
Several incompatible implementations share the nc name: the original/GNU netcat, the OpenBSD rewrite (Ubuntu’s default, adds IPv6 and UNIX sockets), and nmap’s ncat (Fedora’s default, adds TLS and proxying). Their flags differ. If an example below fails, run nc -h to see which one you have.
Examples
Simple port test (-v verbose, -z scan only, do not send data):
- NC via TCP with a 3 second timeout
nc -vz -w 3 <destination IP> 443
- NC via UDP with a 3 second timeout. Treat UDP “success” with suspicion: it only means nothing actively refused the packet, since UDP has no handshake to confirm delivery.
nc -vz -u -w 3 <destination IP> 443
- Continuous NC via TCP with a 3 second timeout every 5 seconds:
watch -n 5 nc -vz -w 3 <destination IP> 443
or with a plain shell loop:
while true; do nc -vz -w 3 <destination IP> 443; sleep 5; done;
Listening
Listening is the other half of debugging connectivity. Run a listener on the destination, connect from the source, and you have tested the path without involving any real application.
- Listen on TCP port 8080, then from the other machine connect with
nc <listener IP> 8080. Anything typed on one side appears on the other:
nc -l 8080
- Quick one-shot file transfer (start the receiver first, then the sender):
nc -l 9000 > received-file        # on the receiver
nc <receiver IP> 9000 < file      # on the sender
Privileged Ports
On Linux, listening on a port below 1024 needs root:
sudo nc -l 443
Netstat
netstat shows the sockets currently open on the local machine: which ports are listening, which connections are established, and (with privileges) which process owns each one. Run it when a service refuses connections and you want to confirm it is actually listening, or when you want to see what a machine is talking to.
On modern Linux, netstat (from net-tools) is considered legacy; ss from the iproute2 package is faster and always installed. Windows ships its own native netstat.exe, which works fine from a Cygwin terminal, so there is no separate Cygwin netstat package.
Availability
| Platform | How to get it |
|---|---|
| Windows (Cygwin) | use the native Windows netstat.exe (works inside the Cygwin terminal) |
| Fedora | sudo dnf install net-tools (or use ss, preinstalled) |
| Ubuntu / Debian | sudo apt install net-tools (or use ss, preinstalled) |
Examples (Linux)
- Show established SSH connections, with the owning process (
-tTCP,-nnumeric,-pprocess,-aall):
sudo netstat -tnpa | grep 'ESTABLISHED.*sshd'
- What is listening, on which port, and which process owns it:
sudo netstat -ltnp
- The same questions answered with
ss:
ss -tnp state established '( dport = :22 or sport = :22 )'
ss -ltnp
Examples (Windows)
- All connections and listeners, numeric, with owning process ID (map the PID with Task Manager or
tasklist | findstr <PID>):
netstat -ano
- Include the executable name (requires an elevated/administrator shell):
netstat -anob
NTttcp
NTttcp is Microsoft’s network throughput benchmark, the Windows-native counterpart to iperf3. Like iperf3 it requires a sender and a receiver, one on each end of the link. Microsoft also maintains ntttcp-for-linux, so a mixed Windows and Linux path can be benchmarked with the same tool family on both ends.
Availability
| Platform | How to get it |
|---|---|
| Windows (native) | download from the NTttcp GitHub releases |
| Windows (Cygwin) | not packaged; run the native Windows binary |
| Fedora / Ubuntu | build ntttcp-for-linux from source |
Examples
- Receiver side (
-r), using 8 threads, listening on its own address:
ntttcp -r -m 8,*,<receiver IP>
- Sender side (
-s), matching parameters, run for 60 seconds:
ntttcp -s -m 8,*,<receiver IP> -t 60
Related Tools
- ctsTraffic, another Microsoft traffic generator. It is better suited to long-running reliability and connection churn testing than to raw throughput numbers.
OpenSSL
OpenSSL is an open source toolkit for SSL/TLS. For network debugging, its s_client subcommand behaves like a TLS-speaking netcat: it performs the TLS handshake (see Network Basics) and shows you the exact certificate chain the server presents, which protocol and cipher get negotiated, and whether the handshake completes at all. The x509 subcommand inspects and converts certificate files locally.
Availability
| Platform | How to get it |
|---|---|
| Windows (Cygwin) | install the openssl package |
| Fedora | sudo dnf install openssl (usually preinstalled) |
| Ubuntu / Debian | sudo apt install openssl (usually preinstalled) |
Live Servers
- Connect to google.com and show its full certificate chain (the
echo -n |or</dev/nullcloses stdin so the command exits instead of waiting for input):
echo -n | openssl s_client -connect google.com:443 -showcerts
- When the server hosts several sites on one IP, set SNI explicitly with
-servername, otherwise you may receive the wrong (default) certificate:
openssl s_client -connect www.google.com:443 -servername www.google.com </dev/null
- Get all subject alternative names (the list of hostnames the certificate is actually valid for):
openssl s_client -connect www.google.com:443 </dev/null | openssl x509 -noout -text | grep DNS:
- Test whether a server still accepts an old protocol version:
openssl s_client -connect example.com:443 -tls1_1 </dev/null
Certificate Files
- Convert a
.cerfile (DER-encoded, which is what Windows usually exports) to a base64.pemfile you can read and paste:
openssl x509 -in VA-Internal-S2-RCA1-v1.cer -out VA-Internal-S2-RCA1-v1.pem
OpenSSL 3 detects the DER format on its own. OpenSSL 1.x needs -inform der added, or it fails with unable to load certificate.
- Check the validity dates of a single certificate:
openssl x509 -in <particular pem>.pem -noout -dates
- Check the dates of every .pem in a folder:
for i in <folder>/*.pem; do echo "$i"; openssl x509 -in "$i" -noout -dates; done
- Recursively find all .pem files and print their expiry dates:
find . -name '*.pem' -type f -print -exec openssl x509 -in {} -enddate -noout \;
Java Trust Stores
A practical combination: pull the certificate a server presents, save it as a .pem, and import it into a Java cacerts keystore (here inside a Dockerfile, hence the RUN):
RUN echo | openssl s_client -servername swa.cdc.gov -connect swa.cdc.gov:443 2>&1 \
      | sed -ne '/-BEGIN CERTIFICATE-/,/-END CERTIFICATE-/p' > cert.pem && \
    "${FORTIFY_EXEC_FOLDER}"/jre/bin/keytool -importcert -alias cdc-swa \
      -noprompt -cacerts -storepass changeit -file cert.pem
For a step-by-step walkthrough of certificate problems, see TLS Triage.
Rsync
rsync synchronizes files between machines (or directories) and only transfers the parts that changed. It runs over SSH by default, resumes interrupted transfers, and can throttle its own bandwidth. That combination is why you reach for it on flaky or slow links, where scp would start over from zero.
Availability
| Platform | How to get it |
|---|---|
| Windows (Cygwin) | install the rsync package |
| Fedora | sudo dnf install rsync |
| Ubuntu / Debian | sudo apt install rsync |
rsync must be installed on both ends of the transfer. On Cygwin, local Windows paths are written as /cygdrive/c/....
Examples
The flag bundle used below: -a archive (recurse, preserve permissions and times), -v verbose, -h human-readable sizes, -z compress in transit, -S handle sparse files, -P show progress and keep partial files so interrupted transfers resume.
- rsync push from local to remote:
rsync -avhzSP --stats folder-of-interest/ username@192.168.122.15:/share/folder-of-interest/
- rsync pull from remote to local, limited to about 3.6 MB/s so the transfer does not saturate the link, with permissions forced on arrival:
rsync -avhzSP --stats --bwlimit=3600 --perms --chmod=a+rwx username@subdomain.domain.com:/home/username/completed/tv.shows/ /share/tv.shows/
- Dry run first, to see what would be transferred or deleted before doing it:
rsync -avhn --delete folder-of-interest/ username@192.168.122.15:/share/folder-of-interest/
Beware the trailing slash: folder/ means “the contents of folder”, while folder means “the folder itself”. Get it wrong and everything lands one directory deeper than you wanted.
SFTP
sftp is an interactive file transfer client that runs over SSH, part of the OpenSSH suite. If you can ssh to a machine, you can almost always sftp to it on the same port 22 with no extra server setup. It replaces legacy FTP, which sent credentials in cleartext.
Availability
| Platform | How to get it |
|---|---|
| Windows (Cygwin) | included in the openssh package |
| Windows (native) | included in Windows 10+ optional feature “OpenSSH Client” |
| Fedora | sudo dnf install openssh-clients |
| Ubuntu / Debian | sudo apt install openssh-client (usually preinstalled) |
Examples
- Open an interactive session (then use
ls,cd,get,put,exit):
sftp username@192.168.122.15
- Connect on a non-standard port (note: capital
-P, unlike ssh):
sftp -P 2222 username@192.168.122.15
- Download or upload a single file without an interactive session:
sftp username@host:/var/log/app.log /tmp/
sftp local-file.txt username@host:/upload/
- Recursively download a whole directory:
sftp -r username@host:/var/log/myapp /tmp/logs/
- Scripted/batch mode. It runs the listed commands, exits non-zero on failure, and suits cron jobs:
echo 'put report.csv /incoming/' | sftp -b - username@host
Since sftp is just SSH underneath, debugging a failing connection is the same as debugging ssh: add -v.
SSH
OpenSSH is the standard client for encrypted remote shells, and also a general-purpose transport: file transfer (sftp, rsync), git, and port forwarding all ride on it. For network debugging, the verbose mode and the tunneling features are diagnostic tools in their own right.
Availability
| Platform | How to get it |
|---|---|
| Windows (Cygwin) | install the openssh package |
| Windows (native) | Windows 10+ optional feature “OpenSSH Client” (ssh.exe in PowerShell) |
| Fedora | sudo dnf install openssh-clients |
| Ubuntu / Debian | sudo apt install openssh-client (usually preinstalled) |
Cygwin and native Windows OpenSSH keep separate configuration. Cygwin reads ~/.ssh inside the Cygwin home; native Windows reads C:\Users\<you>\.ssh. Keys set up in one are not seen by the other.
Debugging
Verbose mode walks through each phase of the connection: TCP connect, host key exchange, which keys are offered, which authentication methods fail. Add up to -vvv for more detail:
ssh -v username@host
Config
Put per-host settings in ~/.ssh/config so connections are reproducible and short to type:
Host jumpbox
  HostName bastion.example.com
  User boris
  IdentityFile ~/.ssh/id_ed25519

Host internal-db
  HostName 10.0.12.5
  User boris
  ProxyJump jumpbox
With the above, ssh internal-db transparently hops through the bastion.
Port Forwarding
- Local forward: expose a remote-only service on your own machine. Here, a database reachable only from the jump host appears on
localhost:5432:
ssh -L 5432:db.internal:5432 username@jumpbox
- Dynamic forward: turn the SSH connection into a SOCKS proxy on
localhost:1080, then point tools like curl atsocks5h://localhost:1080:
ssh -D 1080 username@jumpbox
Key Generation
- Preferred modern key type (ed25519), with extra KDF rounds on the passphrase:
ssh-keygen -o -a 100 -t ed25519 -f ~/.ssh/id_ed25519 -C "example-email@gmail.com"
- RSA fallback for old servers that do not support ed25519:
ssh-keygen -t rsa -b 4096 -f ~/.ssh/id_rsa -C "example-email@gmail.com"
strace
strace traces the system calls a Linux process makes. It shows what a program actually does, regardless of what its own logging claims: which config and certificate files it opens, which addresses it connects to, which DNS lookups it issues. When a tool fails mysteriously with no useful error, strace is how you find out why.
Availability
| Platform | How to get it |
|---|---|
| Windows (Cygwin) | Cygwin ships its own strace.exe, but it is a different Cygwin-specific tracer for Cygwin processes, not the Linux strace |
| Windows (native) | no equivalent; Sysinternals Process Monitor covers the same ground |
| Fedora | sudo dnf install strace |
| Ubuntu / Debian | sudo apt install strace |
Examples
- Which files does this program open? Classic use: find out which CA bundle or config file a TLS client is really reading:
strace -e trace=openat wget -vv https://classic.yarnpkg.com 2>&1 | grep cert
- Show only network-related syscalls (connect, sendto, recvfrom…), follow child processes, and trace each child into its own output file:
strace -e trace=network -ff -o /tmp/dig-trace dig somename.com
- Attach to an already-running process by PID (requires sudo for processes you do not own):
sudo strace -p <PID> -e trace=network
- Time every syscall to find where a slow program is stuck. A
connectorpolltaking seconds points at the network; a slowopenaton NFS points at the filesystem:
strace -T -e trace=network curl -s https://example.com -o /dev/null
Tcpdump
tcpdump captures packets off a network interface. When logs and tools disagree, a packet capture settles the argument. Captures are usually written to a .pcap file and analyzed in Wireshark afterwards.
Capturing requires root/administrator privileges on every platform.
Availability
| Platform | How to get it |
|---|---|
| Windows (Cygwin) | not available; Cygwin cannot capture raw packets |
| Windows (native) | use Wireshark with Npcap, or the built-in pktmon on Windows 10+ |
| Fedora | sudo dnf install tcpdump |
| Ubuntu / Debian | sudo apt install tcpdump |
Examples
- Find your interface names first:
tcpdump -D
- Capture all UDP traffic to/from 1.1.1.1 on interface
wlp7s0, full packets (-s 0), written to a pcap file for Wireshark (this example was used to debug DNSSEC responses from Cloudflare’s resolver):
sudo tcpdump -i wlp7s0 -s 0 -w /tmp/dnssec-cdc4.pcap "host 1.1.1.1 and udp"
- Watch DNS queries live on screen, without name resolution (
-nn) so tcpdump itself does not generate DNS traffic:
sudo tcpdump -i any -nn port 53
- Watch TCP connection attempts to a host. If you see SYNs going out with no SYN/ACK coming back, a firewall along the path is dropping them (see the handshake walkthrough in Network Basics):
sudo tcpdump -i any -nn "host 192.168.122.15 and tcp port 443"
- Read a saved capture back (or open the file in Wireshark):
tcpdump -nn -r /tmp/dnssec-cdc4.pcap
Testssl
testssl.sh is a bash script that audits a server’s TLS setup: which protocol versions and ciphers it accepts, what certificate it serves, and whether it is exposed to known attacks like Heartbleed, ROBOT, or SWEET32.
Availability
Because it is a pure bash script, testssl.sh runs anywhere bash and OpenSSL exist, including inside Cygwin on Windows. It even bundles its own openssl binaries for common platforms.
| Platform | How to get it |
|---|---|
| Windows (Cygwin) | clone the repository (needs the git and bash packages) |
| Fedora | sudo dnf install testssl or clone the repository |
| Ubuntu / Debian | sudo apt install testssl.sh or clone the repository |
Download
Clone the repository. The project moved from drwetter/testssl.sh to testssl/testssl.sh; the old URL redirects to the same repository.
git clone https://github.com/testssl/testssl.sh.git
There are two active branches:
3.3devis the default and gets fixes and new checks first.3.2is the stable release line, for when results need to stay the same between runs.
git clone --branch 3.2 https://github.com/testssl/testssl.sh.git
An existing clone may be following only one branch. Check which one, and switch to the development branch if you want it:
git -C testssl.sh branch --show-current
git -C testssl.sh remote set-branches --add origin 3.3dev
git -C testssl.sh fetch origin && git -C testssl.sh switch 3.3dev
Usage
Point it at a URL:
bash testssl.sh https://www.google.com
Sample output from an older 3.0.8 run (the formatting got mangled at some point, but the findings are all there):
testssl.sh 3.0.8 from https://testssl.sh/ (30c0359 2024-02-13 18:42:33)

      This program is free software. Distribution and
             modification under GPLv2 permitted.
      USAGE w/o ANY WARRANTY. USE IT AT YOUR OWN RISK!

       Please file bugs @ https://testssl.sh/bugs/

###########################################################

Using "OpenSSL 1.0.2-bad (1.0.2k-dev)" [~179 ciphers] on momo:./bin/openssl.Linux.x86_64 (built: "Sep 1 14:03:44 2022", platform: "linux-x86_64")

## Testing all IPv4 addresses (port 443): 172.253.63.105 172.253.63.99 172.253.63.106 172.253.63.103 172.253.63.147 172.253.63.104

Start 2024-02-25 03:13:30 -->> 172.253.63.105:443 (www.google.com) <<--

Further IP addresses: 172.253.122.104 172.253.122.103 172.253.122.105 172.253.122.99 172.253.122.147 172.253.122.106 2607:f8b0:4004:c07::69 2607:f8b0:4004:c07::93 2607:f8b0:4004:c07::63 2607:f8b0:4004:c07::67 rDNS (172.253.63.105): bi-in-f105.1e100.net. Service detected: HTTP

Testing protocols via sockets except NPN+ALPN

SSLv2 not offered (OK) SSLv3 not offered (OK) TLS 1 offered (deprecated) TLS 1.1 offered (deprecated) TLS 1.2 offered (OK) TLS 1.3 offered (OK): final NPN/SPDY grpc-exp, h2, http/1.1 (advertised) ALPN/HTTP2 h2, http/1.1, grpc-exp (offered)

Testing cipher categories

NULL ciphers (no encryption) not offered (OK) Anonymous NULL Ciphers (no authentication) not offered (OK) Export ciphers (w/o ADH+NULL) not offered (OK) LOW: 64 Bit + DES, RC[2,4] (w/o export) not offered (OK) Triple DES Ciphers / IDEA offered Obsolete CBC ciphers (AES, ARIA etc.) offered Strong encryption (AEAD ciphers) offered (OK)

Testing robust (perfect) forward secrecy, (P)FS -- omitting Null Authentication/Encryption, 3DES, RC4

PFS is offered (OK) TLS_AES_256_GCM_SHA384 TLS_CHACHA20_POLY1305_SHA256 ECDHE-RSA-AES256-GCM-SHA384 ECDHE-ECDSA-AES256-GCM-SHA384 ECDHE-RSA-AES256-SHA ECDHE-ECDSA-AES256-SHA ECDHE-ECDSA-CHACHA20-POLY1305 ECDHE-RSA-CHACHA20-POLY1305 TLS_AES_128_GCM_SHA256 ECDHE-RSA-AES128-GCM-SHA256 ECDHE-ECDSA-AES128-GCM-SHA256 ECDHE-RSA-AES128-SHA ECDHE-ECDSA-AES128-SHA Elliptic curves offered: prime256v1 X25519

Testing server preferences

Has server cipher order? yes (OK) -- only for < TLS 1.3 Negotiated protocol TLSv1.3 Negotiated cipher TLS_AES_256_GCM_SHA384, 253 bit ECDH (X25519) Cipher order TLSv1: ECDHE-ECDSA-AES128-SHA ECDHE-ECDSA-AES256-SHA ECDHE-RSA-AES128-SHA ECDHE-RSA-AES256-SHA AES128-SHA AES256-SHA DES-CBC3-SHA TLSv1.1: ECDHE-ECDSA-AES128-SHA ECDHE-ECDSA-AES256-SHA ECDHE-RSA-AES128-SHA ECDHE-RSA-AES256-SHA AES128-SHA AES256-SHA DES-CBC3-SHA TLSv1.2: ECDHE-ECDSA-AES128-GCM-SHA256 ECDHE-ECDSA-CHACHA20-POLY1305 ECDHE-ECDSA-AES256-GCM-SHA384 ECDHE-ECDSA-AES128-SHA ECDHE-ECDSA-AES256-SHA ECDHE-RSA-AES128-GCM-SHA256 ECDHE-RSA-CHACHA20-POLY1305 ECDHE-RSA-AES256-GCM-SHA384 ECDHE-RSA-AES128-SHA ECDHE-RSA-AES256-SHA AES128-GCM-SHA256 AES256-GCM-SHA384 AES128-SHA AES256-SHA DES-CBC3-SHA

Testing server defaults (Server Hello)

TLS extensions (standard) "renegotiation info/#65281" "EC point formats/#11" "session ticket/#35" "next protocol/#13172" "key share/#51" "supported versions/#43" "extended master secret/#23" "application layer protocol negotiation/#16" Session Ticket RFC 5077 hint 100800 seconds but: PFS requires session ticket keys to be rotated < daily ! SSL Session ID support yes Session Resumption Tickets: yes, ID: yes TLS clock skew 0 sec from localtime

Server Certificate #1 Signature Algorithm SHA256 with RSA Server key size RSA 2048 bits Server key usage Digital Signature, Key Encipherment Server extended key usage TLS Web Server Authentication Serial 54866C406C047C7C0A34EC3C3AB1E0EB (OK: length 16) Fingerprints SHA1 D7854FBC47BA3ED33395BD21FFF71643BC27A473 SHA256 448F11FAD35A95A788934732F8351A08BE930C0D5195E93D52D4C57E13072BB4 Common Name (CN) www.google.com subjectAltName (SAN) www.google.com Issuer GTS CA 1C3 (Google Trust Services LLC from US) Trust (hostname) Ok via SAN (same w/o SNI) Chain of trust Ok EV cert (experimental) no ETS/"eTLS", visibility info not present Certificate Validity (UTC) 64 >= 60 days (2024-02-05 08:19 --> 2024-04-29 08:19)

# of certificates provided 3

Certificate Revocation List http://crls.pki.goog/gts1c3/QOvJ0N1sT2A.crl OCSP URI http://ocsp.pki.goog/gts1c3 OCSP stapling not offered OCSP must staple extension -- DNS CAA RR (experimental) available - please check for match with "Issuer" above: issue=pki.goog Certificate Transparency yes (certificate extension)

Server Certificate #2 Signature Algorithm SHA256 with RSA Server key size EC 256 bits Server key usage Digital Signature Server extended key usage TLS Web Server Authentication Serial 55D169AD310983300AC6872F7A8B2B14 (OK: length 16) Fingerprints SHA1 872B8A71846A1C14432200F6FD21E6AC7C21D3F5 SHA256 0093942C6AB658AADB2D3A3CFB40717CE28A23D2B6A2EDCE5D236F9E879E62D0 Common Name (CN) www.google.com subjectAltName (SAN) www.google.com Issuer GTS CA 1C3 (Google Trust Services LLC from US) Trust (hostname) Ok via SAN (same w/o SNI) Chain of trust Ok EV cert (experimental) no ETS/"eTLS", visibility info not present Certificate Validity (UTC) 64 >= 60 days (2024-02-05 08:19 --> 2024-04-29 08:19)

# of certificates provided 3

Certificate Revocation List http://crls.pki.goog/gts1c3/moVDfISia2k.crl OCSP URI http://ocsp.pki.goog/gts1c3 OCSP stapling not offered OCSP must staple extension -- DNS CAA RR (experimental) available - please check for match with "Issuer" above: issue=pki.goog Certificate Transparency yes (certificate extension)

Testing HTTP header response @ "/"

HTTP Status Code 200 OK HTTP clock skew 0 sec from localtime Strict Transport Security not offered Public Key Pinning -- Server banner gws Application banner -- Cookie(s) 3 issued: 2/3 secure, 2/3 HttpOnly Security headers X-Frame-Options: SAMEORIGIN Content-Security-Policy-Report-Only: object-src 'none';base-uri 'self';script-src 'nonce-dXVNDjDTt6VAToHGETYaOw' 'strict-dynamic' 'report-sample' 'unsafe-eval' 'unsafe-inline' https: http:;report-uri https://csp.withgoogle.com/csp/gws/other-hp Cache-Control: private, max-age=0 X-XSS-Protection: 0 Reverse Proxy banner --

Testing vulnerabilities

Heartbleed (CVE-2014-0160) not vulnerable (OK), no heartbeat extension CCS (CVE-2014-0224) not vulnerable (OK) Ticketbleed (CVE-2016-9244), experiment. not vulnerable (OK) ROBOT not vulnerable (OK) Secure Renegotiation (RFC 5746) supported (OK) Secure Client-Initiated Renegotiation not vulnerable (OK) CRIME, TLS (CVE-2012-4929) not vulnerable (OK) BREACH (CVE-2013-3587) potentially NOT ok, "gzip" HTTP compression detected. - only supplied "/" tested Can be ignored for static pages or if no secrets in the page POODLE, SSL (CVE-2014-3566) not vulnerable (OK), no SSLv3 support TLS_FALLBACK_SCSV (RFC 7507) Downgrade attack prevention supported (OK) SWEET32 (CVE-2016-2183, CVE-2016-6329) VULNERABLE, uses 64 bit block ciphers FREAK (CVE-2015-0204) not vulnerable (OK) DROWN (CVE-2016-0800, CVE-2016-0703) not vulnerable on this host and port (OK) make sure you don't use this certificate elsewhere with SSLv2 enabled services https://search.censys.io/search?resource=hosts&virtual_hosts=INCLUDE&q=448F11FAD35A95A788934732F8351A08BE930C0D5195E93D52D4C57E13072BB4 LOGJAM (CVE-2015-4000), experimental not vulnerable (OK): no DH EXPORT ciphers, no DH key detected with <= TLS 1.2 BEAST (CVE-2011-3389) TLS1: ECDHE-ECDSA-AES128-SHA ECDHE-ECDSA-AES256-SHA ECDHE-RSA-AES128-SHA ECDHE-RSA-AES256-SHA AES128-SHA AES256-SHA DES-CBC3-SHA VULNERABLE -- but also supports higher protocols TLSv1.1 TLSv1.2 (likely mitigated) LUCKY13 (CVE-2013-0169), experimental potentially VULNERABLE, uses cipher block chaining (CBC) ciphers with TLS. Check patches RC4 (CVE-2013-2566, CVE-2015-2808) no RC4 ciphers detected (OK)

Testing 370 ciphers via OpenSSL plus sockets against the server, ordered by encryption strength

## Hexcode Cipher Suite Name (OpenSSL) KeyExch. Encryption Bits Cipher Suite Name (IANA/RFC)

x1302 TLS_AES_256_GCM_SHA384 ECDH 253 AESGCM 256 TLS_AES_256_GCM_SHA384 x1303 TLS_CHACHA20_POLY1305_SHA256 ECDH 253 ChaCha20 256 TLS_CHACHA20_POLY1305_SHA256 xc030 ECDHE-RSA-AES256-GCM-SHA384 ECDH 256 AESGCM 256 TLS_ECDHE_RSA_WITH_AES_256_GCM_SHA384 xc02c ECDHE-ECDSA-AES256-GCM-SHA384 ECDH 256 AESGCM 256 TLS_ECDHE_ECDSA_WITH_AES_256_GCM_SHA384 xc014 ECDHE-RSA-AES256-SHA ECDH 256 AES 256 TLS_ECDHE_RSA_WITH_AES_256_CBC_SHA xc00a ECDHE-ECDSA-AES256-SHA ECDH 256 AES 256 TLS_ECDHE_ECDSA_WITH_AES_256_CBC_SHA xcca9 ECDHE-ECDSA-CHACHA20-POLY1305 ECDH 253 ChaCha20 256 TLS_ECDHE_ECDSA_WITH_CHACHA20_POLY1305_SHA256 xcca8 ECDHE-RSA-CHACHA20-POLY1305 ECDH 253 ChaCha20 256 TLS_ECDHE_RSA_WITH_CHACHA20_POLY1305_SHA256 x9d AES256-GCM-SHA384 RSA AESGCM 256 TLS_RSA_WITH_AES_256_GCM_SHA384 x35 AES256-SHA RSA AES 256 TLS_RSA_WITH_AES_256_CBC_SHA x1301 TLS_AES_128_GCM_SHA256 ECDH 253 AESGCM 128 TLS_AES_128_GCM_SHA256 xc02f ECDHE-RSA-AES128-GCM-SHA256 ECDH 256 AESGCM 128 TLS_ECDHE_RSA_WITH_AES_128_GCM_SHA256 xc02b ECDHE-ECDSA-AES128-GCM-SHA256 ECDH 256 AESGCM 128 TLS_ECDHE_ECDSA_WITH_AES_128_GCM_SHA256 xc013 ECDHE-RSA-AES128-SHA ECDH 256 AES 128 TLS_ECDHE_RSA_WITH_AES_128_CBC_SHA xc009 ECDHE-ECDSA-AES128-SHA ECDH 256 AES 128 TLS_ECDHE_ECDSA_WITH_AES_128_CBC_SHA x9c AES128-GCM-SHA256 RSA AESGCM 128 TLS_RSA_WITH_AES_128_GCM_SHA256 x2f AES128-SHA RSA AES 128 TLS_RSA_WITH_AES_128_CBC_SHA x0a DES-CBC3-SHA RSA 3DES 168 TLS_RSA_WITH_3DES_EDE_CBC_SHA

Running client simulations (HTTP) via sockets

Android 6.0 TLSv1.2 ECDHE-ECDSA-AES128-GCM-SHA256, 256 bit ECDH (P-256) Android 7.0 (native) TLSv1.2 ECDHE-ECDSA-AES128-GCM-SHA256, 256 bit ECDH (P-256) Android 8.1 (native) TLSv1.2 ECDHE-ECDSA-AES128-GCM-SHA256, 253 bit ECDH (X25519) Android 9.0 (native) TLSv1.3 TLS_AES_128_GCM_SHA256, 253 bit ECDH (X25519) Android 10.0 (native) TLSv1.3 TLS_AES_128_GCM_SHA256, 253 bit ECDH (X25519) Android 11 (native) TLSv1.3 TLS_AES_128_GCM_SHA256, 253 bit ECDH (X25519) Android 12 (native) TLSv1.3 TLS_AES_128_GCM_SHA256, 253 bit ECDH (X25519) Chrome 79 (Win 10) TLSv1.3 TLS_AES_128_GCM_SHA256, 253 bit ECDH (X25519) Chrome 101 (Win 10) TLSv1.3 TLS_AES_128_GCM_SHA256, 253 bit ECDH (X25519) Firefox 66 (Win 8.1/10) TLSv1.3 TLS_AES_128_GCM_SHA256, 253 bit ECDH (X25519) Firefox 100 (Win 10) TLSv1.3 TLS_AES_128_GCM_SHA256, 253 bit ECDH (X25519) IE 6 XP No connection IE 8 Win 7 TLSv1.0 ECDHE-ECDSA-AES128-SHA, 256 bit ECDH (P-256) IE 8 XP TLSv1.0 DES-CBC3-SHA, No FS IE 11 Win 7 TLSv1.2 ECDHE-ECDSA-AES128-GCM-SHA256, 256 bit ECDH (P-256) IE 11 Win 8.1 TLSv1.2 ECDHE-ECDSA-AES128-GCM-SHA256, 256 bit ECDH (P-256) IE 11 Win Phone 8.1 TLSv1.2 ECDHE-ECDSA-AES128-GCM-SHA256, 256 bit ECDH (P-256) IE 11 Win 10 TLSv1.2 ECDHE-ECDSA-AES128-GCM-SHA256, 256 bit ECDH (P-256) Edge 15 Win 10 TLSv1.2 ECDHE-ECDSA-AES128-GCM-SHA256, 253 bit ECDH (X25519) Edge 101 Win 10 21H2 TLSv1.3 TLS_AES_128_GCM_SHA256, 253 bit ECDH (X25519) Safari 12.1 (iOS 12.2) TLSv1.3 TLS_CHACHA20_POLY1305_SHA256, 253 bit ECDH (X25519) Safari 13.0 (macOS 10.14.6) TLSv1.3 TLS_CHACHA20_POLY1305_SHA256, 253 bit ECDH (X25519) Safari 15.4 (macOS 12.3.1) TLSv1.3 TLS_AES_128_GCM_SHA256, 253 bit ECDH (X25519) Java 7u25 TLSv1.0 ECDHE-ECDSA-AES128-SHA, 256 bit ECDH (P-256) Java 8u161 TLSv1.2 ECDHE-ECDSA-AES128-GCM-SHA256, 256 bit ECDH (P-256) Java 11.0.2 (OpenJDK) TLSv1.2 ECDHE-ECDSA-AES128-GCM-SHA256, 256 bit ECDH (P-256) Java 17.0.3 (OpenJDK) TLSv1.3 TLS_AES_256_GCM_SHA384, 253 bit ECDH (X25519) go 1.17.8 TLSv1.3 TLS_AES_128_GCM_SHA256, 253 bit ECDH (X25519) LibreSSL 2.8.3 (Apple) TLSv1.2 ECDHE-ECDSA-CHACHA20-POLY1305, 253 bit ECDH (X25519) OpenSSL 1.0.2e TLSv1.2 ECDHE-ECDSA-AES128-GCM-SHA256, 256 bit ECDH (P-256) OpenSSL 1.1.0l (Debian) TLSv1.2 ECDHE-ECDSA-CHACHA20-POLY1305, 253 bit ECDH (X25519) OpenSSL 1.1.1d (Debian) TLSv1.3 TLS_AES_256_GCM_SHA384, 253 bit ECDH (X25519) OpenSSL 3.0.3 (git) TLSv1.3 TLS_AES_256_GCM_SHA384, 253 bit ECDH (X25519) Apple Mail (16.0) TLSv1.2 ECDHE-ECDSA-AES128-GCM-SHA256, 256 bit ECDH (P-256) Thunderbird (91.9) TLSv1.3 TLS_AES_128_GCM_SHA256, 253 bit ECDH (X25519)

Done 2024-02-25 03:15:21 [ 115s] -->> 172.253.63.105:443 (www.google.com) <<--
Trippy
Trippy (GitHub) combines ping and traceroute in a live terminal UI: it continuously probes every hop on the path and accumulates per-hop loss and latency statistics, like mtr. Reach for it when a connection is flaky and you need to know which hop is losing the packets.
The binary is named trip.
Availability
| Platform | How to get it |
|---|---|
| Windows (Cygwin) | not packaged for Cygwin; use the native Windows build |
| Windows (native) | winget install trippy (requires Npcap and an admin terminal) |
| Fedora | sudo dnf copr enable atim/trippy && sudo dnf install trippy, or cargo install trippy |
| Ubuntu / Debian | sudo add-apt-repository ppa:fujiapple/trippy && sudo apt install trippy, or cargo install trippy |
Like traceroute, it needs raw sockets: run with sudo on Linux (or grant the binary CAP_NET_RAW), and from an administrator terminal on Windows.
Examples
- Trace a host and watch per-hop loss/latency accumulate (press
qto quit):
sudo trip www.google.com
- Use TCP probes to port 443 instead of ICMP. TCP probes get through networks that drop ICMP, and they experience the path closer to how your actual HTTPS traffic does:
sudo trip www.google.com --protocol tcp --target-port 443
- Unprivileged mode: no sudo, ICMP via datagram sockets. This works on macOS, and on Linux when the
pinggroup range is configured:
trip www.google.com --unprivileged
Related Tools
- mtr, the classic continuous traceroute that Trippy modernizes;
sudo dnf install mtr/sudo apt install mtr-tiny. Not packaged for Cygwin; WinMTR exists as an old native Windows port.
Whois
whois looks up the registration records behind a domain name, IP address, or autonomous system (AS) number. When an unfamiliar IP shows up in your logs or in a traceroute, whois tells you who owns it and which network it belongs to. Different registries hold different data, so the useful trick is the -h flag, which asks a specific whois server.
Availability
| Platform | How to get it |
|---|---|
| Windows (Cygwin) | install the whois package |
| Windows (native) | Sysinternals whois |
| Fedora | sudo dnf install whois |
| Ubuntu / Debian | sudo apt install whois |
Examples
- Who registered a domain:
whois google.com
- Who owns an IP block, asking ARIN (the registry for North America) directly:
whois -h whois.arin.net "152.130.0.0"
whois -h whois.arin.net 8.8.8.8
- Map an IP to its AS number and network name via Team Cymru. This is the fastest way to find which provider an address belongs to:
whois -h whois.cymru.com 40.119.152.231
- List every route (prefix) an AS announces, via the RADb routing registry. Here AS32934 is Facebook; this kind of query is useful when building firewall allowlists:
whois -h whois.radb.net -- '-i origin AS32934' | grep ^route
- Look up which registered route covers an IP:
whois -h whois.radb.net 8.8.8.8
- Query the RIPE database (Europe/Middle East) for an IPv6 address, without recursing to other registries:
whois -r --sources RIPE 2a03:2880:20ff:d::face:b00c
Network Basics
Every request crosses several layers, and each layer fails in its own way. The application protocol (HTTP, DNS, SSH) rides on a transport (TCP or UDP), which rides on IP routing, which rides on a physical link. The OSI model names seven layers, but for everyday debugging you can get by with four questions: does the name resolve, can I reach the address, does the transport connect, and does the protocol on top behave. The diagnosis chapter walks through those questions in order.
Connection Setup
Before a single byte of HTTP moves, the client and server have already done a lot of work. Each step below costs at least one round trip, can fail independently, and has a tool in this guide that tests it in isolation.
1. DNS lookup. The client resolves the hostname to an IP address. If this step is wrong, everything after it is wrong too, which is why dig comes first in any diagnosis.
2. The TCP three-way handshake. TCP gives both sides a reliable byte stream, and it opens with three packets:
client  ── SYN ──────────────▶  server   "I want to talk. My sequence number starts here."
client  ◀────────── SYN-ACK ──  server   "Heard you. Mine starts here."
client  ── ACK ──────────────▶  server   "Confirmed."
After the third packet the connection is established and either side may send data. The whole exchange costs one round trip. Failures here are easy to read in a packet capture: a SYN that gets no reply at all usually means a firewall dropped it silently, while an immediate RST reply means the port is closed or a device refused the connection. netcat tests exactly this layer and nothing above it, and tcpdump lets you watch the three packets directly.
3. The TLS handshake. For HTTPS, the two sides next negotiate encryption on top of the open TCP connection:
- The client sends a ClientHello: the protocol versions and cipher suites it supports, plus the server name it wants (SNI).
- The server picks the parameters, sends back its certificate chain, and proves it holds the matching private key.
- The client checks that chain against its local trust store. This is the step that fails when a corporate proxy intercepts TLS or a certificate expires.
- Both sides derive the session keys and exchange Finished messages.
TLS 1.3 fits this into one round trip; TLS 1.2 needs two. openssl s_client performs this handshake and stops, which makes it the right probe when TCP connects fine but HTTPS does not.
4. The application talks. Only now does the client send its HTTP request and wait for a response. curl -w can time every phase above separately, so you can see exactly which step ate the time.
A cold HTTPS request therefore pays for DNS, one round trip of TCP, and one or two round trips of TLS before the first byte of content moves. The latency chapter puts numbers on what that costs.
Request Timing
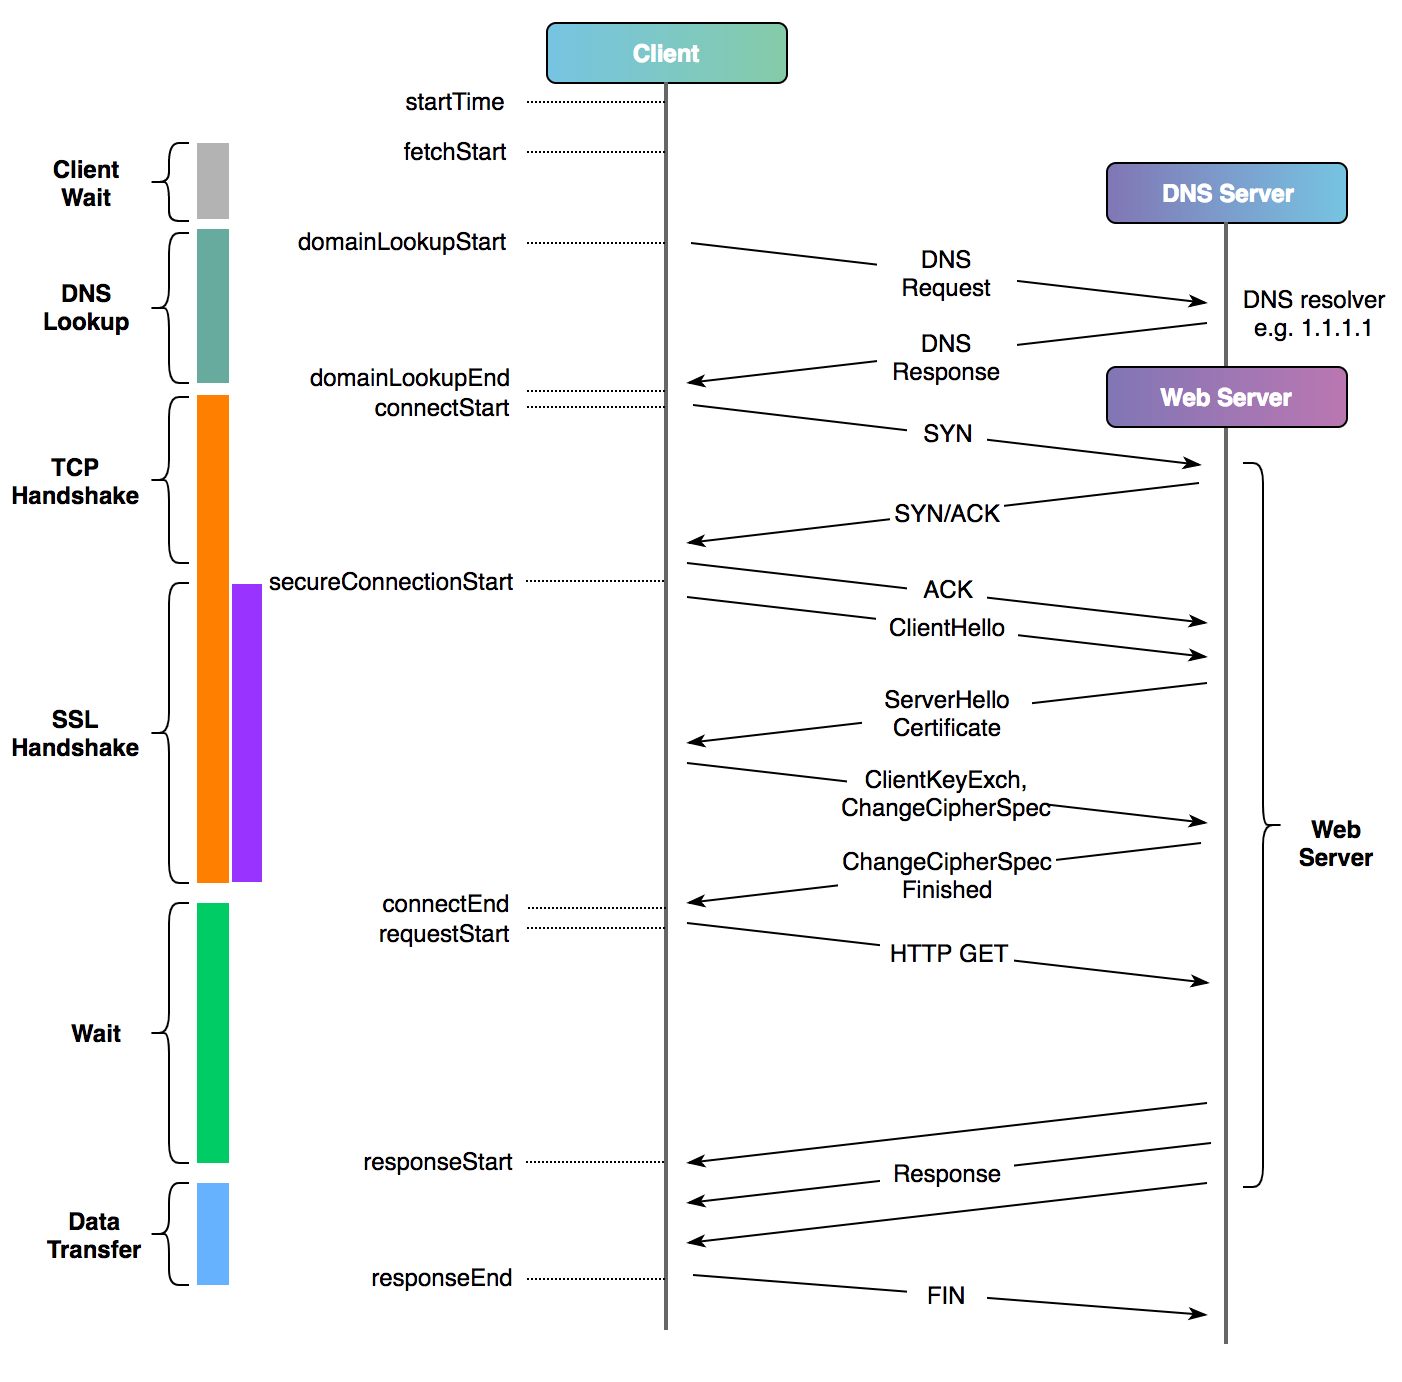
Cloudflare’s post on timing web requests has a good picture of the whole sequence for one HTTP request:
Mutual TLS
In the handshake described above, only the server proves who it is. The client stays anonymous as far as TLS is concerned, and identity is handled later by the application (cookies, passwords, API keys).
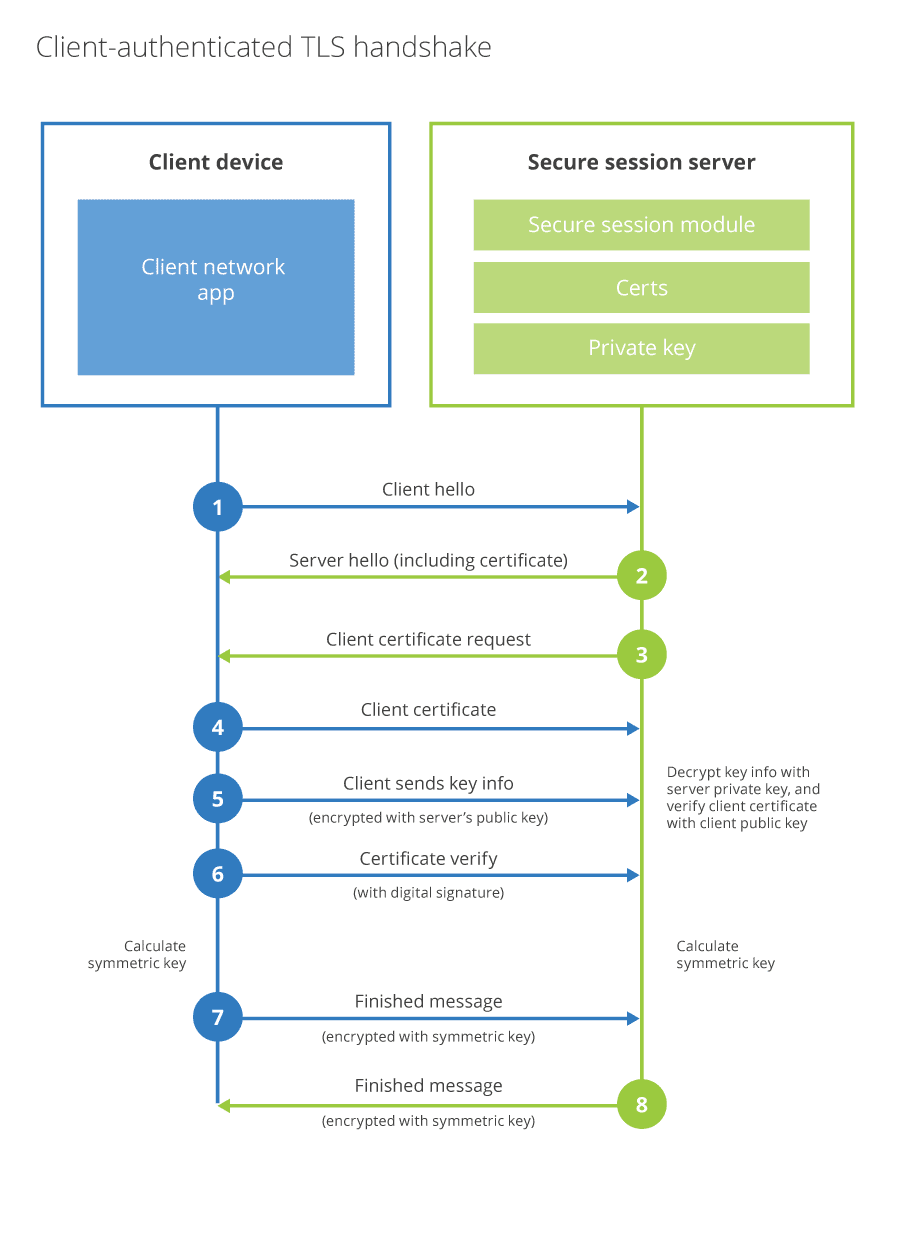
Mutual TLS authentication (mTLS) moves the client’s proof of identity into the handshake itself. The flow extends step 3 above:
- After sending its own certificate, the server also sends a CertificateRequest, naming the certificate authorities it will accept client certificates from.
- The client sends its client certificate, then signs a hash of the handshake with its private key (the CertificateVerify message). The signature proves the client actually holds the key, not just a copy of the certificate.
- The server validates the client certificate against the CA it trusts for clients. Both sides have now authenticated each other before any application data is exchanged.
When a required client certificate is missing, expired, or signed by the wrong CA, the connection dies during the handshake, before any HTTP status code exists. If you see a TLS alert (often certificate required or handshake failure) instead of a 403, think mTLS. To test, present a client certificate explicitly:
curl -sv https://auth.example.com --cert client.pem --key client-key.pem
openssl s_client -connect auth.example.com:443 -cert client.pem -key client-key.pem
Testing
- har-to-curl converts a HAR file (saved from the browser’s network tab) into curl commands, so you can replay a browser request from the command line.
Further Reading
- TCP/IP Illustrated, Vol. 1: The Protocols. Read it with Wireshark open and capture the protocols as you go.
IP Addressing
In Practice
Private vs. Public IPs
A public IP is globally routable: any machine on the internet can, in principle, send packets to it. A private IP only has meaning inside your own network. RFC 1918 reserves three ranges for private use, and RFC 6598 adds a fourth for ISPs. You will see them everywhere:
| CIDR range | Addresses | Where you usually meet it |
|---|---|---|
10.0.0.0/8 | 10.0.0.0 to 10.255.255.255 | corporate networks, cloud VPCs |
172.16.0.0/12 | 172.16.0.0 to 172.31.255.255 | Docker’s default bridge, cloud VPCs |
192.168.0.0/16 | 192.168.0.0 to 192.168.255.255 | home routers |
100.64.0.0/10 | 100.64.0.0 to 100.127.255.255 | carrier-grade NAT inside an ISP’s network |
A NAT device (your home router, a cloud NAT gateway) rewrites private addresses to a public one on the way out, which is how a whole office shares one public IP.
The practical debugging consequences:
- If a server’s “IP address” starts with 10., 172.16-31., or 192.168., that address is useless to anyone outside the network it lives in. A common cause of “it works from here but not from home.”
- Two different networks can both use 192.168.1.0/24 internally. VPNs between them then collide, and packets go to the wrong place with no error message.
- If your router’s “public” address is in
100.64.0.0/10, you are behind your ISP’s NAT and cannot accept inbound connections.
Using ipcalc
ipcalc does the subnet math: give it an address in CIDR notation and it prints the network, netmask, broadcast, and usable host range.
ipcalc 10.130.75.80/26
The most common question it answers is “are these two IPs in the same subnet?” Run it on both addresses and compare the network lines.
To check whether your connection has working IPv6, open https://ipv6.test-ipv6.com/.
Latency
Latency is how long a packet takes to travel from one machine to another. What most tools report is round-trip time (RTT): there and back again. The two get conflated constantly, so when someone quotes “latency to the server”, check whether they mean one way or round trip. The difference is a factor of two.
Bandwidth and latency are independent. A 10 Gbit/s link to Sydney still takes 160 ms to deliver the first byte, and no upgrade changes that. You can buy more bandwidth; you cannot buy a lower speed of light.
Speed of Light in Fiber
Light travels 299,792 km/s in a vacuum. The glass in optical fiber has a refractive index of about 1.5, so light inside it moves at roughly 200,000 km/s. That gives a handy rule of thumb:
one-way time (ms) ≈ distance (km) ÷ 200
round-trip time (ms) ≈ distance (km) ÷ 100
Worked example for New York to London: 5,585 km ÷ 200 = 28 ms one way, so 56 ms round trip. That is the physical floor. Measured RTTs run higher because cables do not follow great circles, and every router along the path adds queueing and processing delay.
| Route | Distance | One way in fiber | Minimum RTT | Typical measured RTT |
|---|---|---|---|---|
| London to Frankfurt | 640 km | 3 ms | 6 ms | 10 to 15 ms |
| New York to San Francisco | 4,148 km | 21 ms | 41 ms | about 60 ms |
| New York to London | 5,585 km | 28 ms | 56 ms | about 75 ms |
| New York to Sydney | 15,993 km | 80 ms | 160 ms | 200 ms and up |
Combine that with the handshake math from Network Basics: a cold HTTPS request spends about four round trips (DNS, TCP, TLS, then the request itself) before the first byte of content arrives. At 75 ms RTT that is 300 ms of pure waiting, with zero bytes of payload moved. This is why CDNs put servers near users: the only way to cut propagation delay is to shorten the distance.
Jitter
Jitter is the variation in latency from packet to packet. A path with a steady 80 ms RTT feels fine on a video call; a path that swings between 40 and 150 ms breaks up, even though its average looks better. Interactive traffic (VoIP, video, SSH typing, games) cares about jitter as much as about latency itself.
The usual cause is queueing: a router with oversized buffers absorbs bursts of traffic and drains them slowly, a problem known as bufferbloat. Wi-Fi retransmissions and route changes add to it.
To measure it, run a UDP test with iperf3, which reports jitter directly:
iperf3 -c <server IP> -u -b 10M
or watch the per-hop standard deviation column in trippy or mtr to find which hop introduces the variation.
Further Reading
Diagnosis
A rough order of operations when “the network is broken”. Each step maps to one layer of the connection walkthrough in Network Basics.
- Name resolution. Does the name resolve, and to the right address? Start with dig and compare resolvers. Switch to delv if a validating resolver returns SERVFAIL.
- Reachability. Can you open a TCP connection to the port at all? netcat answers this in one line.
- Path. If reachability is flaky, find the lossy hop with trippy or mtr.
- TLS. If the connection opens but the protocol fails, inspect the handshake and certificates with openssl s_client and testssl.
- Application. If all of the above pass, time the request phases with curl and trace what the client actually does with strace.
- Packets. When tools disagree, capture with tcpdump and read the capture in Wireshark.
TLS Triage
Someone reports “the site is broken” or “we get a certificate error”. Work through these in order. Each step either finds the problem or rules out a layer.
Examples use badssl.com, which hosts a deliberately broken site for nearly every TLS failure, and www.va.gov as a well-behaved public site. Everything here runs in Cygwin with the openssl, curl, bind-utils and jq packages.
1. Find the Failing Layer
Before opening openssl, run curl once and read the exit code. It separates DNS, TCP, and TLS failures without any guesswork.
curl -sS -o /dev/null -w '%{http_code}\n' https://expired.badssl.com
echo "exit code: $?"
| Exit | What failed | Typical message | Next step |
|---|---|---|---|
| 6 | DNS | Could not resolve host | dig, not a TLS problem |
| 7 | TCP | Failed to connect ... Could not connect to server | firewall or service down, try netcat |
| 28 | Timeout | Connection timed out after ... | packets dropped somewhere, try trippy |
| 35 | TLS handshake | unsupported protocol, handshake failure | client and server share no protocol or cipher, see step 5 |
| 60 | Certificate verification | certificate has expired, self-signed certificate, no alternative certificate subject name matches, unable to get local issuer certificate | step 2 |
| 0, HTTP 400 | Server wanted a client cert | 400 No required SSL certificate was sent in the body | mTLS, see curl --cert/--key |
Exit 60 covers four different problems. The message after the code tells you which one:
| curl message (exit 60) | Meaning | Usual fix |
|---|---|---|
certificate has expired | past notAfter | renew |
no alternative certificate subject name matches target hostname | cert is for a different name | add the name as a SAN, or you hit the wrong vhost (missing SNI) |
unable to get local issuer certificate | server did not send its intermediate | fix the server’s chain file; browsers often hide this because they cache intermediates |
self-signed certificate in certificate chain | chain ends at a root you do not trust | corporate TLS inspection, or a private CA: add the root to your bundle, do not add -k |
Do not reach for curl -k to make the error go away while triaging. It turns off exactly the check you are trying to run.
2. Read the Chain
-servername sends SNI. Without it, a server hosting many sites returns its default certificate, and you end up debugging the wrong certificate.
echo | openssl s_client -connect www.va.gov:443 -servername www.va.gov -showcerts 2>/dev/null \
  | grep -E '^ *[0-9] s:|^ +i:'
 0 s:CN=www.va.gov
   i:C=GB, O=Sectigo Limited, CN=Sectigo Public Server Authentication CA DV R36
 1 s:C=GB, O=Sectigo Limited, CN=Sectigo Public Server Authentication CA DV R36
   i:C=GB, O=Sectigo Limited, CN=Sectigo Public Server Authentication Root R46
 2 s:C=GB, O=Sectigo Limited, CN=Sectigo Public Server Authentication Root R46
   i:C=GB, ST=Greater Manchester, L=Salford, O=Comodo CA Limited, CN=AAA Certificate Services
Read it top down. Each i: (issuer) should equal the next line’s s: (subject). If the list stops at 0 and the issuer is not a root your machine trusts, the server is missing its intermediate. That is the unable to get local issuer certificate case.
The leaf certificate’s names and dates:
echo | openssl s_client -connect www.va.gov:443 -servername www.va.gov 2>/dev/null \
  | openssl x509 -noout -subject -issuer -dates -ext subjectAltName
subject=CN=www.va.gov
issuer=C=GB, O=Sectigo Limited, CN=Sectigo Public Server Authentication CA DV R36
notBefore=Dec 20 00:00:00 2025 GMT
notAfter=Jan 18 23:59:59 2027 GMT
X509v3 Subject Alternative Name:
    DNS:www.va.gov, DNS:va.gov
Clients ignore the CN and match only against the Subject Alternative Names. If the name you typed is not in that list, you get the hostname mismatch error.
For a pass/fail answer, -checkend exits non-zero if the certificate expires within the given number of seconds. That makes it usable in cron or CI:
echo | openssl s_client -connect www.va.gov:443 -servername www.va.gov 2>/dev/null \
  | openssl x509 -noout -checkend $((30 * 86400)) || echo "expires within 30 days"
3. Check Every IP
A name behind a load balancer or round-robin DNS resolves to several IPs, and a renewal that missed one node shows up as an intermittent error. This checks each IPv4 address separately, sending the same SNI to each:
#!/usr/bin/env bash
# Print the certificate expiry served by every IPv4 address behind a name.
# Usage: bash cert-expiry-by-ip.sh <hostname> [port]
set -euo pipefail

host=${1:?usage: $0 <hostname> [port]}
port=${2:-443}
now=$(date +%s)

# dig +short follows CNAMEs and prints them too; keep only the IPv4 answers.
dig +short A "$host" | grep -E '^[0-9.]+$' | while read -r ip; do
  end=$(timeout 5 openssl s_client -connect "$ip:$port" -servername "$host" </dev/null 2>/dev/null \
        | openssl x509 -noout -enddate 2>/dev/null | cut -d= -f2) || true
  if [ -z "$end" ]; then
    printf '%s,%s,NO CERTIFICATE\n' "$host" "$ip"
    continue
  fi
  days=$(( ($(date -d "$end" +%s) - now) / 86400 ))
  printf '%s,%s,%s,%s days\n' "$host" "$ip" "$end" "$days"
done
$ bash cert-expiry-by-ip.sh www.va.gov
www.va.gov,152.130.96.221,Jan 18 23:59:59 2027 GMT,115 days
dig +short prints CNAME targets before the addresses, which is why the script filters for lines that look like IPs.
4. Sweep a Domain
Certificate Transparency logs list every certificate a public CA has issued for a domain, which gives you a list of names nobody remembered to put in the inventory. This pulls the names from crt.sh, connects to each one in parallel, and reports days left plus whether the certificate actually verifies:
#!/usr/bin/env bash
# Find every name in Certificate Transparency logs for a domain, then check
# the certificate each one serves right now: days left, expiry, and whether
# it verifies. Soonest expiry first.
# Usage: bash cert-expiry-domain.sh <domain> [parallel-jobs]
#        subfinder -silent -d <domain> | bash cert-expiry-domain.sh - [parallel-jobs]
set -euo pipefail

domain=${1:?usage: $0 <domain> [parallel-jobs]}
jobs=${2:-10}

check() {
  local name=$1 out end days verify
  out=$(timeout 5 openssl s_client -connect "$name:443" -servername "$name" \
        -verify_hostname "$name" </dev/null 2>/dev/null) || true
  end=$(printf '%s' "$out" | openssl x509 -noout -enddate 2>/dev/null | cut -d= -f2) || true
  if [ -z "$end" ]; then
    printf 'NONE\t%s\tno TLS answer on 443\n' "$name"
    return
  fi
  verify=$(printf '%s' "$out" | sed -n 's/^ *Verify return code: [0-9]* (\(.*\))$/\1/p' | tail -1)
  days=$(( ($(date -d "$end" +%s) - $(date +%s)) / 86400 ))
  printf '%s\t%s\t%s\t%s\n' "$days" "$name" "$end" "$verify"
}
export -f check

names() {
  if [ "$domain" = - ]; then
    cat   # names on stdin, one per line
  else
    # name_value holds several names separated by newlines
    curl -fsS --retry 5 --retry-delay 10 --max-time 120 \
      "https://crt.sh/?q=%25.${domain}&output=json" | jq -r '.[].name_value'
  fi
}

# Wildcards are cut down to their base name so there is something to connect to.
names \
  | sed 's/^\*\.//' | tr 'A-Z' 'a-z' | sort -u \
  | xargs -P "$jobs" -I{} bash -c 'check "$1"' _ {} \
  | sort -n
Run it as bash cert-expiry-domain.sh badssl.com 20. Here it is fed a short list on stdin so the output is easy to read:
$ printf '%s\n' '*.badssl.com' expired.badssl.com self-signed.badssl.com \
    WRONG.host.badssl.com nope.invalid | bash cert-expiry-domain.sh - 5
-4183   expired.badssl.com      Apr 12 23:59:59 2015 GMT   certificate has expired
NONE    nope.invalid            no TLS answer on 443
31      badssl.com              Oct 26 20:03:01 2026 GMT   ok
31      wrong.host.badssl.com   Oct 26 20:03:01 2026 GMT   hostname mismatch
727     self-signed.badssl.com  Sep 21 21:00:16 2028 GMT   self-signed certificate
Things to know:
- crt.sh is a free service and often returns 502 under load. The script retries, then stops with curl’s error instead of printing an empty report. When it is down, feed the names in yourself:
subfinder -silent -d badssl.com | bash cert-expiry-domain.sh -. - An earlier version of this script only checked names that answered
200 OKfirst. HTTP/2 servers answerHTTP/2 200and many sites answer with a redirect, so most live hosts were skipped. Connecting withopenssldirectly avoids the problem. NONEdoes not always mean dead. The name may be internal-only, behind a VPN, or listening only on a port other than 443.- The
dayscolumn only covers expiry. Read the last column too: a certificate with 700 days left that is self-signed is still broken.
5. Check Protocols
Which TLS versions does the server accept?
#!/usr/bin/env bash
# Which TLS versions does a server accept?
# Usage: bash tls-versions.sh <hostname> [port]
set -euo pipefail

host=${1:?usage: $0 <hostname> [port]}
port=${2:-443}

for v in tls1 tls1_1 tls1_2 tls1_3; do
  # SECLEVEL=0 lets the client offer old protocols at all. Distro crypto
  # policies can still block them; see the note under "Protocols and ciphers".
  if timeout 5 openssl s_client -connect "$host:$port" -servername "$host" \
       "-$v" -cipher 'DEFAULT:@SECLEVEL=0' </dev/null 2>/dev/null | grep -q '^New, TLS'; then
    printf '%-8s offered\n' "$v"
  else
    printf '%-8s not offered\n' "$v"
  fi
done
$ bash tls-versions.sh www.va.gov
tls1     not offered
tls1_1   not offered
tls1_2   offered
tls1_3   not offered
Your local OpenSSL limits what this can see. OpenSSL 3 refuses TLS 1.0 and 1.1 unless you lower the security level, which the script does with @SECLEVEL=0. Fedora and RHEL crypto policies can still block legacy signatures underneath that, and you get invalid digest instead of a handshake. So “not offered” for old versions can mean “my client could not ask”. For a compliance answer, use testssl.sh, which ships its own OpenSSL built with the legacy options, or nmap:
nmap --script ssl-enum-ciphers -p 443 www.va.gov
Both grade every cipher the server offers, which is what an audit against M-15-13 and BOD 18-01 needs.
6. Check HSTS
BOD 18-01 expects port 80 to redirect to HTTPS, and HTTPS responses to carry Strict-Transport-Security with max-age of at least one year, includeSubDomains, and preload. The check has to follow the redirect: va.gov and www.va.gov can send different headers.
#!/usr/bin/env bash
# Check HSTS on a host, and on wherever it redirects to, the way M-15-13 and
# BOD 18-01 grade it. Pass an IP to test one edge node or a CDN before DNS moves.
# Usage: bash hsts-check.sh <hostname> [ip]
set -euo pipefail

host=${1:?usage: $0 <hostname> [ip]}
ip=${2:-}

pin=()
[ -n "$ip" ] && pin=(--resolve "$host:443:$ip")

hsts() {  # print the HSTS header value of a URL, or nothing
  curl -sS -o /dev/null -D - --max-time 10 "${pin[@]}" "$1" \
    | tr -d '\r' | sed -n 's/^strict-transport-security: *//Ip' | tail -1
}

report() {
  local url=$1 got lc age missing=()
  got=$(hsts "$url")
  if [ -z "$got" ]; then
    echo "FAIL  $url sends no Strict-Transport-Security header"
    return
  fi
  lc=$(printf '%s' "$got" | tr 'A-Z' 'a-z')
  age=$(printf '%s' "$lc" | sed -n 's/.*max-age="\{0,1\}\([0-9]*\).*/\1/p')
  [ "${age:-0}" -ge 31536000 ] || missing+=("max-age>=31536000")
  [[ $lc == *includesubdomains* ]] || missing+=(includeSubDomains)
  [[ $lc == *preload* ]]           || missing+=(preload)
  if [ ${#missing[@]} -eq 0 ]; then
    echo "OK    $url  $got"
  else
    echo "WARN  $url  $got"
    echo "      missing: ${missing[*]}"
  fi
}

report "https://$host/"

# Only the first hop is pinned: --resolve applies to $host alone, so a
# redirect to another name resolves normally.
final=$(curl -sS -L -o /dev/null --max-time 15 "${pin[@]}" -w '%{url_effective}' "https://$host/")
[ "$final" != "https://$host/" ] && report "$final"

# Port 80 should only redirect to https.
loc=$(curl -sS -o /dev/null --max-time 10 ${ip:+--resolve "$host:80:$ip"} -w '%{http_code} %{redirect_url}' "http://$host/")
echo "INFO  http://$host/ -> $loc"
$ bash hsts-check.sh va.gov
WARN  https://va.gov/  max-age=31536000; preload
      missing: includeSubDomains
OK    https://www.va.gov/  max-age=31536000; includeSubDomains; preload
INFO  http://va.gov/ -> 301 https://va.gov:443/
The script checks each directive on its own, because servers write them in different orders and cases. GitHub, for example, sends includeSubdomains.
7. Test Before Cutover
Before a DNS cutover, you want to know the new origin or CDN edge serves the right certificate for your name. --resolve makes curl connect to an IP you choose while still sending the real hostname in SNI and the Host header:
curl -sS -o /dev/null --resolve www.va.gov:443:152.130.96.221 \
  -w 'ip=%{remote_ip} http=%{http_code} verify=%{ssl_verify_result}\n' https://www.va.gov/
The format is host:port:address, and the host and port must match the URL exactly. A malformed entry such as --resolve https://www.va.gov:443:1.2.3.4 at least fails loudly (exit 49). A well-formed entry that does not match is worse: --resolve va.gov:443:... for a www.va.gov URL, or port 80 for an https:// URL, is silently ignored, so curl resolves normally, tests the old site, and reports success. Always print %{remote_ip} to confirm you reached the IP you meant.
When the new target is a CDN hostname rather than an IP, --connect-to saves the dig step:
curl -sS -o /dev/null --connect-to www.example.gov:443:www.example.gov.edgekey.net:443 \
  -w 'ip=%{remote_ip} verify=%{ssl_verify_result}\n' https://www.example.gov/
verify=0 means the certificate on the new target is valid for your name. If it is not, curl exits 60 and prints a non-zero verify (an OpenSSL verify code, such as 20 for a missing issuer), and that is what your users would see on cutover day. This is the one test where -k would hide exactly the problem you are looking for.
hsts-check.sh above takes the IP as a second argument (bash hsts-check.sh www.va.gov 152.130.96.221) to check the headers the new target sends, too.
To see the cutover from your users’ point of view, run the same curl from several regions. A VPN with a CLI works, for example piactl set region uk-london && piactl connect in a loop. This matters most when you have users overseas.
8. Time the Request
When the complaint is “TLS is slow”, split the request into phases:
curl -sS -o /dev/null https://www.va.gov/ -w \
  'dns=%{time_namelookup}s tcp=%{time_connect}s tls=%{time_appconnect}s ttfb=%{time_starttransfer}s total=%{time_total}s\n'
dns=0.000012s tcp=0.009375s tls=0.036600s ttfb=0.390449s total=0.523465s
Each value is cumulative from the start of the request. So the TLS handshake took tls - tcp, about 27 ms here, and the server spent ttfb - tls thinking. A large tls - tcp next to a small tcp usually points to a long certificate chain, a busy server doing expensive key exchanges, or a TLS-inspecting proxy in the path. See Latency for why the tcp number cannot go below the round trip.
Further Reading
- badssl.com: a broken example for most failure modes, useful for checking that your client really does fail
- SSL Labs deployment best practices
- Feisty Duck OpenSSL Cookbook